Not much to report, but I'll go into a lot of detail anyway. I'm bored.
I finally got a pH pen which will have to hold me over until I can get another monitor. Even with the monitor, it's still useful because it lets me see the pH in the rockwool (what the plants see) as well as in the reservoir. I can't measure EC, but mixing the nutrients as instructed by the mfr will get me close enough. And no, it's not a crappy Hanna! (It's a Eutech)
I'm out of distilled water, so using tap water (non chlorinated, thankfully). I know it's about 300ppm (though not sure what's in it - need to request a water analysis), hopefully that doesn't cause any problems.
The ugly fulsium wilt like symptoms are gone, but there are some light spots on the leaves that look like a nutrient deficiency.
This pH pen showed me something very interesting - pH coming out of the drip stakes was 5.7, but draining back into the reservoir (after going through the (previously soaked/leached) rockwool cubes and the cocotek mat (not previously rinsed) showed the pH at 6.3(!). My best guess is that the coco mat was a relatively high pH... probably neutral (7.0), and this was causing some nutrient lockout problems.
I have added 10ml/gal of 35% H202 and cycled/flushed the system with fresh pH adjusted (5.9) water for an hour. That should kill most of the cooties that may have still been lurking in the system. I am next (in the middle of it now), draining this water to make sure cooties are actually removed from the system as well as removing any pH imbalance/buffering crud. Note that keeping this level of H2O2 in the system for any length of time (a day or more?) can kill your plants. Always pre-mix 35% H2O2 with a good amount of water. It is caustic and should be treated as an acid. This is not the water-like drugstore stuff!
The plants are growing so fast and seem nutrient deprived, so even though it's only been a 10 days, not 2 weeks, I'm jumping right to the "3rd+ week vegetative" nutrient levels. I'll be adding the Super B+, but not using any more Royal Gold (fulvic acid) until the plants start to set fruit - the Royal Gold is too expensive to use haphazardly.. and these are tomatoes, not basil, saffron, or some other high value crop. The expense isn't justified.
To this, I'll be adding 2ml/gal of 35% H2O2. This small amount will help keep molds, fungi, etc. out of the system as well as provide additional oxygen to the plants. The oxygen giving effects of H2O2 lasts about 4 days. I'm not that concerned about this benefit as I always aerate the hell out of the reservoir. I'll thrown in another 10ml (total for 20gals) every 5 days or so whenever I add water to the system.
Lastly, a few plants have gotten big enough that the roots have taken hold in the rockwool cubes. I have tied the twine to the top bars in the tent for these plants and started training them to the twine.
Final measurements were:
Water: 22 gallons (nutrients measured for 20gals to allow for evaporation/transpiration)
Micro "Bang" P (Add 1st): 95ml
Grow "Bing" N (Add 2nd): 190ml
Bloom K (Add 3rd): 57ml
Super B+: 75ml
H2O2: 25ml
pH Down: 40ml
Final pH measurement: 6.0
This is the low end of what the mfr recommends (6.0-6.5) during the vegetative cycle. Optimal nutrient uptake range for a plant is 5.7-6.3 or thereabouts. Since the mfr recommends 5.6-6.1 during the bloom stage, I'm staying at the low end during the vegetative stage to avoid stress to the plants when going from vegetative to flowering/bloom nutrient ratios.
Always dilute, here's how I do it, and the order I do it in:
- Drain reservoir. Flush with 10 gals pH adjusted (important!) water if desired. I usually do this every other nutrient change. This removes built-up nutrient salts, cleans out a lot of crud (fungi, loose bits of rockwool, etc), and helps prevent lock-up.
- Add 5 gals water
- Add Grow (N)
- Pull drain stand-offs so all liquids drain immediately back into reservoir and don't get absorbed (much) by rockwool.
- turn air and big/flood water pump on to start circulating/mixing
- Add 5 gals water
- Add Micro (P)
- Add 5 gals water
- Add Bloom (K)
- Add 5 gals water
- Add Super B+
- Add H2O2
- Add final 2 gals water
- Let circulate 5 mins
- Take pH reading. Add pH adjustment (almost always 'pH Down') 20ml at a time.
- Allow 2 minutes of circulation/mixing between additional pH readings
- Repeat last 2 steps until pH is at optimal level
- Turn off big/flood water pump, put drain standoffs back in.
- Turn on drip pump for 5 minutes to get a little nutrient back into the rockwool. Do NOT walk away at this point. I have nearly killed plants on 3-4 different occasions by doing this and discovering 24-48 hours later that the poor things had a non-stop flow of water and nutrients all that time.
- Put drip pump back on timer. Close-up the tent, clean up. Grab a beer.
Note that if you did flush the system, the rockwool will have been extremely saturated for some length of time. Expect the plants to show mild symptoms of over-watering for a day or so. When they are really young (like now), I'll go so far as to skip the next timed watering and set an alarm on my calendar to put that cycle (in this case, midnight) back on the timer the next day.
Saturday, October 3, 2009
Tuesday, September 29, 2009
Big Plans for the Spring
I've been wanting to own a big system for quite a while, and I feel I've learned enough to handle it. I may not know the answers, but when I don't, I know where to look and who to ask in order to get them.
I'm considering getting into the wholesale herb market. There are quite a few decent restaurants within 25 miles of here as well as farmer's markets where I could sell directly. I found a 160 site (yes, 160 plants!) system that will fit in an 8'x 8' area.
It uses 3.5" netpots with only enough expanded clay pellets (aka: LECA, Hydroton) to hold the seedling in place until it's roots can grab the netpots. It's an aeroponic system with fine mist sprayers. This type of system is *extremely* high performance, but does require a lot of monitoring - filters must be cleaned daily, nozzles checked to make sure they don't clog, and a back-up pump and UPS is a must. Since there is no media to retain water, a pump failure or power outage can turn the roots to hay and destroy the entire crop in a matter of a couple of hours.
Being aeroponic, it only needs about 2/3 strength nutrient solution which saves a considerable sum of money over the course of a year.
Here's a picture of the system:

Systems available through retail are ridiculously expensive. This one is no exception (though for the number of sites, it's relatively cheap compared to most). It prices out at about $3500. (Yikes!).
I've already begun researching parts and am pretty certain I can build just as well for $400-$500. I'll be making a few modifications such as plumbing a second pump into the same lines with a back flow prevention valve and alternating cycle timers. That way if one pump fails, the other will keep the plants alive and well (though obviously slowing growth somewhat) if a failure should occur while I'm on vacation.
The real issue with this system is the cost of electricity. you want 40-60 watts per square foot of HID lighting. With a high performance system such as this, you definitely want to have 60w/sf. Here's my calculations:
Pd160 is 96" x 84", 58" height.
96"/12"=8 ft
84"/12"=7 ft
8'x 7'=56 sf
60w*56sf=3,360 watts
Biggest lights are 1000 watts.
That's 3x1000 watt lights. That would give us:
3000w/56sf=53.57 watts/sf
We can use a rail-type light mover to make up the difference.
As a side note:
600 watt lights are a lot more efficient wrt lumens/sf (they can be placed closer, and are also much cooler, which means less climate control issues), but 1000 watt lights penetrate deeper. Something I'll need given the "V" configuration of this system and the fact that the basil will be growing 18-24" tall... a 600w won't penetrate that far below the canopy top with sufficient light to keep the lower growth alive.
The whole issue of lighting is rather complicated. I know almost nothing about it and could write a few chapters. Just take my word on it. Unless there is no choice for your application (such as this one), use more 600w's, or even more 400w's before choosing a 1000w light.
Back to the problem at hand:
3x1000 watt lights require 3 separate 15 amp circuits. They also use 3kWh of electricity every hour (I iz reel smurt, huh?). The lights run 16-18 hours a day. Let's call it 17 hours. Here's the math:
3kwh*17hrs/day= 51kWh/day
51kWh*31 days = 1,581kWh/month.
Electric rate is $0.083566 per kWh
$0.083566*1581kWh=$132.12/mo
$132 per month just for the lights. *sigh*. That's more than what I pay for electricity for the entire house right now.
It's hard to believe, but it would be *way* cheaper to build a greenhouse, heat that, and just use the lights for supplemental lighting for a few hours in the morning and evening (when the sun is low in the sky in the winter).
So, why not do it? Firstly, it's not allowed by the HOA. Technically (according to covenants), you can't grow *any* food on the property. Secondly, I'm built into the side of a hill and the land has a roughly 35 degree slope, making any sort of out building impossible. With the house built, there is no place for earth-moving equipment to get in and level it out - it's a 25 foot near-vertical drop 6 feet from the side of the house.
I do have a few ideas, such as a screened-in balcony greenhouse where the second story window is for the upstairs bedroom, but this is a log home - the walls aren't easily modified as with a "normal" house.. they are 7.5" thick solid wood, and it's all load bearing.
I'll be throwing ideas around all winter to sort out how to handle this as running all these lights full time isn't a practical (or very earth-friendly) solution.
It's all just hurdles to be overcome, right?
Dodging the (Fusarium Wilt) Bullet
Since the last post, I have removed the plant that was damaged, since it also seemed to be the most sickly. I also removed all affected leaves from the rest of the plants in hopes of pushing the crop to completion. A few of them look more like sticks at the moment due to the heavy leave removal, but as you can see, in only 7 days, they have grown significantly, doubling, perhaps even tripling their size. The angle/perspective of the picture is different, but still... HUGE growth!:
Today (9/29/09):

A week ago (9/22/09):

Now that they are out of their seedling stage, I've cooled things down a bit with the A/C and lowered the humidity by opening some vents in the tent. It's right where I want it. 80 degrees. I know from having previously putting the thermometer/hygrometer on the rockwool cubes that the humidity is 5-10 percent higher at the plant than on the control board. This puts the plant at 50-55 percent humidity. Perfect:

As you know, it was looking like I may have Fusarium Wilt infection. The only way to determine this for certain is to cut a stalk in half lengthwise. Since I was throwing out the damaged plant (also the most impacted by the chlorisis/yellowing and dried up leaves), I decided to use that one.
Here's what it looked like (you probably want to click on the picture to see it full-size/close up):

Here's what a badly infected plant looks like. Notice the brown discoloration in the vascular tissue:

So... it looks like the plants are safe; At least for now. When it comes time to do a nutrient change, I'll be re-sterilzing the system (except for the cubes of course), then adding about 50ppm of 35 percent Hydrogen Peroxide to the system to help kill-off anything evil still lurking in the plants as well as preventing future infections.
Sunday, September 27, 2009
Tomato update
5 days after transplant to hydroponic drip system:
Note: Some/most (all?) of these posts are going to ramble on a bit. I'm using this as much for my own grow journal as to keep friends and other readers informed as to the going's on. I want enough detail/reasoning so that if I have the same problem 5 years from now, I can look back at this log and see the cause and resolution. Always keep good logs!
The pH was a bit too low and the plants were experiencing a bit of nutrient burn on the tips of the leaves. Adding an additional 5 gallons of water weakened the nutrient solution and brought the pH up to 5.8. Right where I want to be.
As expected, the plants were getting too much water with twice a day waterings. I have reduced this to once a day. I usually don't start indoors this early in the year - it's still too warm and too humid, but I was bored. The heat and humidity have caused their share of problems. With the AC set to 74 degrees, temperature in the tent has hovered around 85-88 degrees, and humidity about 70-75%. Reservoir temperature has been around 80. The reservoir temperature being so high is especially bad.
Ideally, air temp would be around 80, humidity at 50-60%, and nutrient temperature at 65-70 degrees. The nutrient reservoir temperature being so high (especially when combined with the high humidity and overwatering) can lead to Fusarium wilt. Water temps that high make for a perfect breeding ground. I really need to spend the $ and get a water chiller.
For now, I have opened up the top of all 3 doors in the tent and left the door to the room open in order to bring temp and humidity down. I really hate doing this as it is possible to introduce all sorts of parasites, mold spores, etc. to the plants. The main reason for this tent (other than reflection of light) is to avoid these problems by having a closed environment.
Here is a picture of what one of the plants looks like that is over-watered and is possibly suffering from fusarium wilt. The HID light really throws off the white balance of the camera. I have attempted to edit this picture to make the colors of the plant look nearly correct, even though it makes other items in the background look a bit odd. Notice the drooping leaves, and in the later stages, the complete rolling/curling and browning of the leaves (top right).

Here is how the entire set-up looks now. Astute observers will notice a few small changes.
- I've put cube covers (vinyl/polyester) over the rockwool cubes. These are to keep algae from forming. They are white on top to reflect light back to the plant. They are black on the bottom to keep as much light as possible from the cubes, further preventing algae. There's a little algae there already, but it will die off within a few days with no light.
- I've raised the flourescent light that I use for seedlings. When the plants first started showing these symptoms, I wasn't sure what was going on. I thought maybe they were getting too much light (light bleaching), so I turned off the HID and hung the flourescent light between it and the plants and just left that on. That didn't improve the situation, so I went back to the HID. I'm keeping the flourescent high because: The HID light causes RFI to the crappy Hanna monitor making it's readings useless. When I need to take readings, I have to turn off the HID, making it very dark in the tent. The flourescent being up high allows me to work. This is a real PITA since you don't want to hot-start HIDs - it can dramatically shorten their life - bad thing when the bulbs cost $100 each. Fortunately I use a digital ballast and it has a built-in timer to avoid hot-starts. I can just plug the ballast back in and it will turn on the light automatically when it's safe to do so.
- The fan has moved. It was clipped on the corner of the tray. This was too much wind for the plants that are closest, and the seedlings in the back weren't getting any wind at all (there should be enough to make the leaves flutter without moving the whole plant). So, I moved the fan to the top of the control board. This has partially alleviated the problem. What I really need is a larger fan with a *really* low speed setting. But this one works fine once they've aged a few weeks.
- The plant on the front (lower) right may appear smaller. If you look very closely (click on the picture), you'll see twine wrapped around it. When I was moving the fan, the entire head fell off onto this (the biggest or 2nd biggest) plant, snapping several branches and bending the stalk badly in multiple places. I pinched off the broken branches, stood the plant up, and am using the weight of the twine to keep it standing straight. If it doesn't recover in a week or so, I'll throw it out. :-(

Now, the part you've all probably been wondering about. Is it all worth it? Well, to me, hydro is easier, certainly cleaner, and far more interesting. For those that are just about growing and getting food, here's a litle motivation:
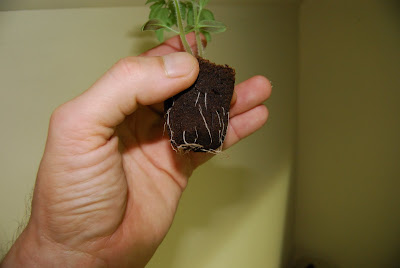
I germinated a bunch seeds from the stable owners at the same time. Two of them went into the hydro set-up, the rest went into an outside planter (which gets more and better light than the hydro set-up). I used miracle grow for the dirt since that's what most people would use (I would do something totally different if I was growing outside, but this is an experiment). These seeds were germinated and transplanted (rapid rooter and rockwool cube for hydro, the planter for soil) on the same days.
I didn't have a ruler, so my hand will have to do for comparison purposes. First the hydro:

Now the soil:

Convinced yet???
.
Note: Some/most (all?) of these posts are going to ramble on a bit. I'm using this as much for my own grow journal as to keep friends and other readers informed as to the going's on. I want enough detail/reasoning so that if I have the same problem 5 years from now, I can look back at this log and see the cause and resolution. Always keep good logs!
The pH was a bit too low and the plants were experiencing a bit of nutrient burn on the tips of the leaves. Adding an additional 5 gallons of water weakened the nutrient solution and brought the pH up to 5.8. Right where I want to be.
As expected, the plants were getting too much water with twice a day waterings. I have reduced this to once a day. I usually don't start indoors this early in the year - it's still too warm and too humid, but I was bored. The heat and humidity have caused their share of problems. With the AC set to 74 degrees, temperature in the tent has hovered around 85-88 degrees, and humidity about 70-75%. Reservoir temperature has been around 80. The reservoir temperature being so high is especially bad.
Ideally, air temp would be around 80, humidity at 50-60%, and nutrient temperature at 65-70 degrees. The nutrient reservoir temperature being so high (especially when combined with the high humidity and overwatering) can lead to Fusarium wilt. Water temps that high make for a perfect breeding ground. I really need to spend the $ and get a water chiller.
For now, I have opened up the top of all 3 doors in the tent and left the door to the room open in order to bring temp and humidity down. I really hate doing this as it is possible to introduce all sorts of parasites, mold spores, etc. to the plants. The main reason for this tent (other than reflection of light) is to avoid these problems by having a closed environment.
Here is a picture of what one of the plants looks like that is over-watered and is possibly suffering from fusarium wilt. The HID light really throws off the white balance of the camera. I have attempted to edit this picture to make the colors of the plant look nearly correct, even though it makes other items in the background look a bit odd. Notice the drooping leaves, and in the later stages, the complete rolling/curling and browning of the leaves (top right).

Here is how the entire set-up looks now. Astute observers will notice a few small changes.
- I've put cube covers (vinyl/polyester) over the rockwool cubes. These are to keep algae from forming. They are white on top to reflect light back to the plant. They are black on the bottom to keep as much light as possible from the cubes, further preventing algae. There's a little algae there already, but it will die off within a few days with no light.
- I've raised the flourescent light that I use for seedlings. When the plants first started showing these symptoms, I wasn't sure what was going on. I thought maybe they were getting too much light (light bleaching), so I turned off the HID and hung the flourescent light between it and the plants and just left that on. That didn't improve the situation, so I went back to the HID. I'm keeping the flourescent high because: The HID light causes RFI to the crappy Hanna monitor making it's readings useless. When I need to take readings, I have to turn off the HID, making it very dark in the tent. The flourescent being up high allows me to work. This is a real PITA since you don't want to hot-start HIDs - it can dramatically shorten their life - bad thing when the bulbs cost $100 each. Fortunately I use a digital ballast and it has a built-in timer to avoid hot-starts. I can just plug the ballast back in and it will turn on the light automatically when it's safe to do so.
- The fan has moved. It was clipped on the corner of the tray. This was too much wind for the plants that are closest, and the seedlings in the back weren't getting any wind at all (there should be enough to make the leaves flutter without moving the whole plant). So, I moved the fan to the top of the control board. This has partially alleviated the problem. What I really need is a larger fan with a *really* low speed setting. But this one works fine once they've aged a few weeks.
- The plant on the front (lower) right may appear smaller. If you look very closely (click on the picture), you'll see twine wrapped around it. When I was moving the fan, the entire head fell off onto this (the biggest or 2nd biggest) plant, snapping several branches and bending the stalk badly in multiple places. I pinched off the broken branches, stood the plant up, and am using the weight of the twine to keep it standing straight. If it doesn't recover in a week or so, I'll throw it out. :-(

Now, the part you've all probably been wondering about. Is it all worth it? Well, to me, hydro is easier, certainly cleaner, and far more interesting. For those that are just about growing and getting food, here's a litle motivation:
I germinated a bunch seeds from the stable owners at the same time. Two of them went into the hydro set-up, the rest went into an outside planter (which gets more and better light than the hydro set-up). I used miracle grow for the dirt since that's what most people would use (I would do something totally different if I was growing outside, but this is an experiment). These seeds were germinated and transplanted (rapid rooter and rockwool cube for hydro, the planter for soil) on the same days.
I didn't have a ruler, so my hand will have to do for comparison purposes. First the hydro:

Now the soil:

Convinced yet???
.
Tuesday, September 22, 2009
Tomatoes Started; and an Overview of the System
I've been growing kitchen herbs (rosemary, basil, etc) for quite a while in an ebb and flow system that I later converted to a drip system. The reasons for this include that it uses half the water, half the nutrients, and no "high water mark" of nutrient salt build-ups and about a dozen other reasons that all equate to much lower operating costs, less trouble, and better growing plants.
Here's a picture of various peppers, basil, and some cauliflower I was growing all at the same time earlier this year. The pepper plant in back (top left) is about 4 feet tall. The basil plant in front (lower right) is about 2.5 feet tall.

I've decided to grow tomatoes this time. I've always hated tomatoes, but the stable owners recently gave me some that I could not only manage to swallow, but actually liked. This got me to researching various strains. I've decided on the Seed Savers Gold Medal Tomato. According to Ben Quisenberry's 1976 seed list, it is "Large, Yellow, streaked red; firm and smooth... The sweetest tomato you ever tasted. The yellow with streaks and blotches makes them a gourmet's joy when sliced.". Seed Savers Exchange calls it their finest bi-color tomato. Here's a crappy picture of the seed packet:

Rockwool is probably the most common media to use in a hydroponic system. I'll be using 4" rockwool cubes, but started them in Rapid Rooters instead of the small rockwool starter cubes. I've found that the rockwool starter cubes hold WAY too much water for the seedlings and tends to drown them.
Rapid Rooter Package:

Rockwool Starter Cubes:

Seedlings require a near 100% humid environment. The easiest way to do this is to use a garden flat with a humidity dome such as this:

Even though seedlings require near 100% humidity, they are also easy to drown, and need a reasonable amount of air circulation. Since I was leaving for nearly two weeks, I had to get fairly inventive in order for them to survive. I bought this insert tray, put it in my ebb and flow table and set it up to flow water only to about 1/2" high twice a day. You can see the seedlings in the rapid rooters in this picture.
They are three different sizes because they were started on different dates. The two in the top right were seeds from the tomatoes received from the stable owner, started a week before the ones on the left. The ones on the left and lower right are the Gold Medal tomatoes, started a week apart. Normally you wouldn't do this as they have very different nutritional requirements between their first week (smallest ones) and 3rd week (top right), but sometimes you just do what ya gotta do.

As I've said, I converted the Ebb & Flow (aka: flood/drain) system to a drip system. You can see here that I've put 4" rockwool cubes in and set up the drip system. The green in the main 3x3 tray is algae. This is only 4 days after cleaning the entire system with a bleach water solution (hydroponics can be just about sterile when done right). Wherever there's light and water, there will be algae! Note the small fan. This is to keep a good air exchange going even when the tent is closed (vents in bottom to let air in). More importantly, it causes the plants to grown nice, strong, thick stalks. Needed to support the massive growth they see in a hydroponics system. The small flourescent light in the lower left provides the low level lighting needed by the seedlings. When started I slide the garden flat with humidity dome underneath it.

This next picture is the "control board" I built. It consists of an indoor/outdoor thermometer/barometer. You can see the outdoor sensor wire hanging at canopy height (top of the plants) so I not only know the condition of the room, but know what the plants are feeling. The lower box (blue) is a Hanna grow check monitor. It monitors pH and EC (Electrical Conductivity - much more accurate than PPM/TDS). It also monitors the nutrient temperature in the reservoir. I tried saving $50 buying this instead of the more expensive one. Don't do it. This thing is a piece of crap. It doesn't even function properly when the light is on. Now I have to spend $300 for the good one and have a $250 brick. The board itself is a cutting board that I drilled holes in. I used 1/4-20 hardware to attach it all to the board. Everything is held up with jack chains and s-hooks making it infinitely adjustable.

This is a 400 watt Metal Halide light in a hood with with 6" vents and a glass cover making it airtight. 6" vent tubing pulls cool air from outside the tent on the left via the 6" Sunleaves fan on the right. This cools the light bulb so as not to heat up the plants. Hot air exits through the portal on the right. Notice the portal at the top right in the ceiling, and also the cross-bars in the roof. I'll be talking more about them later. The Sunleaves fan is *really* quiet.

The tent itself is made by Secret Jardin. It is a model DR120 and is 4'x4'x7'(not sure about the height). It's the best on the market. Lightproof, portals, vents, and access doors everywhere. The entire interior is reflective allowing me to use a 400watt light instead of a 600watt - It paid for itself in a year with the electricity I saved. It also has a removable liner in the bottom to catch water and make clean-up easy between harvests. The entire tent folds up into a bag about 6" in diameter and 3' long.

Another shot of the florescent shop light (with grow specific tubes). If you look really close below the light, you can see another small portal where the electric cord exits. More on this later. You can also see one of the side access doors - these make it really easy to reach the plants in the back of the tray.

Here is a picture of the other side. Another portal in the bottom, the other side access door, and a roll-up velcro'd vent door. It has a fine mesh screen built-in to keep nasty critters out. You can also see most of the electrical connections. Coming out the portal are the air pump, low volume water pump (for drip system), and fan cord. There's yet another lower portal in back. Cables coming out of that include the high volume water pump (for ebb & flow - I use it for draining the reservoir quickly), HID (MH) light to the ballast, and the PH/EC monitor.

The ballast for the HID/MH light:

It runs 18 hours a day. It's plugged into a simple (but heavy duty) timer:

This is the small pump I use for the drip system. It's about $13 and uses something like 12 watts. The big one for the ebb & flow system (now used for draining the reservoir) was about $100 and uses about 100 watts. Again, big savings going to the drip system.

It's *extremely* important to keep the nutrient mix well oxygenated. Because of this, I use two 18" airstones on a dual diaphragm pump. I have had several aquariums in my life, tested many pumps, even a small industrial "quiet" greenhouse pump, and this beats them all. This entire set-up is directly above my bed. With this pump and the Sunleaves fan, the only thing I hear at night is the water bubbling.(!)

I have tried several brands of rockwool over the years, and Grodan is simply the best. Doesn't compact, doesn't crumble, and there aren't loose pieces clogging up the water pump, drippers, or drain-back tubes. I prefer the 4" over the 6" cube. They are about 1/3 the price - downright cheap if you buy them by the case. 6" cubes have the same problems of the roots growing out the bottom anyway. Note that rockwool has a fairly high ph level. Hydroponic/Aeroponic systems need a ph between 5.3 and 6.2 depending on the system, nutrients, and what you are growing. In order to get the ph down to a reasonable level, soak the rockwool cubes in ph 5.0-5.5 water for 24 hours (add "ph down" to the water to get it to this level). With starter cubes, you can put them in a salad spinner to remove the excess water. With the big cubes/blocks, about all you can do is put the plants in them and not water them for a day or two.


As I was saying. 6" cubes have the same problem as 4" cubes... the roots grow out the bottom and lay on the tray, exposed to light. This is Very Bad! Roots must be kept in darkness. Exposure to light turns them green - they start acting like the plant (above ground) instead of roots. Additionally, laying in a pool of water in the drainback channels in the tray can cause root rot. Root rot is bad. Umm-kay?
So, how do we avoid this? How about a semi-porous media in the bottom of the tray? Yeah, that would do it. It just so happens that they make a mat out of coir (treated coconut husks). They also make cubes (similar to the rockwool cubes I'm using). Something I want to experiment with in the future as it's 100% organic and biodegradable. Rockwool is not. Coir requires a different chemistry than rockwool due to it's water and air retention properties, but that's another post. Here's the coir package:

Here's the tray with the mat in it after I cut it to size and trimmed holes for the drainage and flood pipes. It doesn't need to be cut neatly. It just needs to fit in the tray and be under the rockwool cubes. Normally this would be put in before the cubes and drip stakes were in place. I only did it this way (having to remove everything and put it back) to make all the pieces of this project easier to understand. The coco/coir mat will give the roots something to grow into and protect them (mostly) from the light. Just remember not to lift the cubes after about the 2nd week or you'll rip the roots from the plant! It will be interesting to see if the coco coir ends up covered in algae since it will be damp and exposed to light.

This picture shows the tee fitting for the drip system. The small pump goes into a 1/2" hose which comes out the lid of the reservoir. It goes to this tee, which has 1/2" hoses coming out each side. 90 degree elbows, then 1/2" hose to the back. The spaghetti tubes that feed the drip stakes are 1/8" and plug directly into the 1/2" hose with hard plastic fittings. These are all common parts available at any indoor gardening center for a few dollars. Below the tee is one of two drain pipes that go back into the reservoir. You can control the water level in the tray (for ebb & flow) by putting extensions between the tray and the drain cap.

As I was saying above. I use the big ebb and flow pump to drain the reservoir (usually filled to 20 gallons, though it will hold 30) for the weekly (or therabouts) nutrient changes. I do this via an adapter and about 50 feet of 1/2" tubing. This is why you see the 1/2" hose plugged into the center of the table in a few of these pictures - I was in the middle of changing nutrients.
The big pump gets rid of about the first 17 gallons. It sets too high in the water to get the rest. So I then unplug the drip pump from the tee, plug it into the 50' hose, and that gets rid of all but about the last quart. Effective and relatively fast.
I'm just using the rockwool cube to hold the hose down so it doesn't go flying out of the tray and make a mess of things.. spraying nutrient solution on the carpet at a rate of about 1 GPM is bad.

Here's a picture of the rubbermaid reservoir with the holes I cut in it for various stuff. On the left is the power to both the drip pump and big ebb & flow pump, as well as the 1/2" tube from the drip pump to the tee fitting in the tray. On the right are the cables for the ph and TDS sensors, as well as both hoses from the air pump going to the 18" airstones.
Note two things here. First is the green things in the airlines. These prevent water from draining back to the air pump in case of power or pump failure. This *can* siphon the entire reservoir dry onto your pretty floors. These are available at any pet/aquarium shop for about $1 each. Second. Notice all the white stuff on the one airhose (the other one was replaced with a new piece). Those are the nutrient salts that I spoke about that can build-up on the root system and even cause nutrient lock-out. A drip system will prevent most build-up on the roots. Nutrient lockout - that's a whole 'nother blog posting as well.

The other end of the 50' hose, draining into the bathtub. Bleach bottle is there to keep the hose from flopping out. Note to self - next time I take a picture of my bathtub, clean it first!

These are the three parts of the nutrient mix. They can't ship them all together in one bottle or they interact and will cause nutrient lock-out; preventing the plants from absorbing the nutrients. These bottles are really expensive, but a little goes a long ways... a few tablespoons of each for a 20 gallon solution.

So, how do you know how to mix all this stuff together? Good question! The nutrient companies provide feed charts. I have a spreadsheet for these. I simply plug in my base water PPM, gallons of water, and it spits out the answers. (again, PPM is messy as different companies use different formulas and EC is the true measure.. so I use the formula that puts me in the middle).

To this, I add a little Royal Gold (Fulvic Acid) and Super B+ (B vitamins). These help immensely with fast growth and are worth the extra money. These two are the white bottles in the background of the above pictures.
While we are on the subject of nutrient solutions, a few quick notes. All nutrient solution feed charts are based on the assumption that your water is 0 ppm. The only water that is 0 ppm (or close) is distilled and reverse osmosis water. I looked into a portable reverse osmosis system (along with a reservoir and float valve so it wouldn't take a whole day to change the nutrients). In addition to being pretty expensive ($500-$600), it introduces a whole 'nother problem - Nutrient solutions don't typically have calcium or magnesium in them as they expect your water to have it. Distilled and RO water do not. Which means you have to buy an additive such as Cal-Mag and figure out how much you need.. more hassle, more expense. No thank you!
Hydroponics will work well as long as your water is initially below 200ppm. Ideally below 150ppm. I know my water hovers right around 300ppm, so I simply add a few gallons of distilled water to it to get it down to between 150 and 200ppm. It's not a linear thing and doesn't take as much as you might think. Usually 2-3 gallons in a 20 gallon mix is enough.
One more word on water: If your water is chlorinated (thankfully mine is not!), you need to let it set, ideally for about a day, before you add it to the system. Chlorine is cyanide to plants and any beneficial microbes living in your system (this goes for soil as well).
As you already know from our earlier discussion, you need to get your ph to between 5.5 and 6 (I try to get it right at 5.5 when I do the nutrient change as pH tends to rise as water evaporates and the nutrients become more concentrated. You'll also want to know what your PPM/TDS is once all the nutrients are added. Most nutrient companies give you measurements, but these only get you close. You'll final measurement is PPM/EC. THAT tells you how much nutrient(s) you have in the water.
Before you can do that, you'll need to calibrate your ph and TDS/combo meter. This should be done weekly. To do it, you'll need reference solutions and the manual for your meter/monitor. They look like this:

Note that you should always keep your ph meter wet. Most probes come with a cap and storage solution. New probes are expensive. Treat them nicely.
Ok, enough about the system already. On to the 'maters!
These Gold Medal tomatoes, being an indeterminate type (mainly meaning vine-type as opposed to bushy or small tree), has presented a few challenges. Namely, what to do with all those vines in such a small space. I could use a rope trellis, which would limit access. A hard (wood/plastic) trellis, but that would make access impossible. I even bought a book on growing tomatoes indoors, and they politely side-stepped this whole discussion. Finally I had an idea: I will use twine. Lay one end of it in the rockwool cube hole so that once the starter cubes are in and roots grow through to the cube, it's held solid.
I'll then take the other end and tie it to the poles/beams in the ceiling of the tent. So I measured out a piece as far as it might possibly need to go (across the tent) plus room to tie a knot, and made 19 more just like it. I then laid one end in the hole, and the rest over the side of the tray taking care not to lay them in the tray. Don't want them to get all wet and funky and possibly give a plant the cooties later on.
I won't tie up the other end to the ceiling until I need to. No sense in making things any more awkard to work on until needed. Here's a picture of the complete system with the strings in place (still draining nutrients, hence the hoses):

(again) The tomatoes were started in rapid rooters. They are ready to transplant into the rockwool cubes when roots start to show through:
Transplanting is as simple as (gently, so as not to damage the roots) placing them in the holes in the rockwool cubes. Note that I have put the smallest plants the farthest away from the light as they need the least, while the bigger plants will love it. The exception being the two plants in the lower right corner (front right of the tray). These were the seperate strain given to me by the stable owners. They will still be fine here. The reflective surface of the tent and the 400 HID light in this small space give them plenty of light.
At this point, everything is ready to go. I've added 20 gallons of tap water and 2 gallons of distilled water. I've added all the nutrients for a 20 gallon batch (this allows for 2 gallons of evaporation during the week) by pouring them right down this hole after removing the drain cap:

I've made a dipstick to keep an eye on water levels during the week. Here you can see it showing 22 gallons.

I plug the drip pump directly into the outlet for a minute to make sure water is going everywhere it should and no place it shouldn't. All looks well:

So I set the second timer to water twice a day for 15 minutes and plug the drip pump into it (not shown):

Chances are this will be too much to begin with and the plants will start to wilt. If they do, I'll back it off to once a day. Hard to believe that in a few weeks they will need watering 10-16 times a day!
Normally I would check pH and EC immediately after a nutrient change. At the beginning of a grow, since the rockwool (even well soaked in ph 5-5.5 water) will impact the readings, I'll wait until tomorrow to take those measurements. From that point on, I'll be checking water level, temp, ph, TDS, as well as air temp, canopy temp and humidity every day. I'll be keeping a spreadsheet/log of these readings so that if something starts to go wrong, it will be easy to isolate what's happening.
BTW. If you are really interested in this subject, I have come across three outstanding books:

The first (on left) is a great introductory book that won't scare off anybody. It even has plans for several different systems (very easy to build) in the back of the book. It's worth it's price for the plans alone as commercially built systems are ridiculously expensive.
The book in the middle... it's the bible. It covers every aspect of gardening, both hydroponic and soil. Systems, nutrients, lighting, pest control, nutrient deficiency analysis, the list goes on. If you only buy one book, make it this one.
The last one (on right) is a college level textbook. It has everything and then some. From plant microbiology to commercial greenhouse operations to making your own nutrient formulations from elemental salts. This book has it all. It is NOT however, light reading. It's my bedside book. A page or two a day is all you need. ;-)
In the upcoming months, I'll be playing with a Deep Water Culture (DWC) system as well as a DIY fogger system. I'll also be doing a comparative grow with and without CO2 to determine if it's really worth the time and money. Stay tuned!
If you have any questions, suggestions, etc. Please drop me a line. I'm always interested in tinkering with new systems and ideas (more than growing the food, really).
Here's a picture of various peppers, basil, and some cauliflower I was growing all at the same time earlier this year. The pepper plant in back (top left) is about 4 feet tall. The basil plant in front (lower right) is about 2.5 feet tall.

I've decided to grow tomatoes this time. I've always hated tomatoes, but the stable owners recently gave me some that I could not only manage to swallow, but actually liked. This got me to researching various strains. I've decided on the Seed Savers Gold Medal Tomato. According to Ben Quisenberry's 1976 seed list, it is "Large, Yellow, streaked red; firm and smooth... The sweetest tomato you ever tasted. The yellow with streaks and blotches makes them a gourmet's joy when sliced.". Seed Savers Exchange calls it their finest bi-color tomato. Here's a crappy picture of the seed packet:

Rockwool is probably the most common media to use in a hydroponic system. I'll be using 4" rockwool cubes, but started them in Rapid Rooters instead of the small rockwool starter cubes. I've found that the rockwool starter cubes hold WAY too much water for the seedlings and tends to drown them.
Rapid Rooter Package:

Rockwool Starter Cubes:

Seedlings require a near 100% humid environment. The easiest way to do this is to use a garden flat with a humidity dome such as this:

Even though seedlings require near 100% humidity, they are also easy to drown, and need a reasonable amount of air circulation. Since I was leaving for nearly two weeks, I had to get fairly inventive in order for them to survive. I bought this insert tray, put it in my ebb and flow table and set it up to flow water only to about 1/2" high twice a day. You can see the seedlings in the rapid rooters in this picture.
They are three different sizes because they were started on different dates. The two in the top right were seeds from the tomatoes received from the stable owner, started a week before the ones on the left. The ones on the left and lower right are the Gold Medal tomatoes, started a week apart. Normally you wouldn't do this as they have very different nutritional requirements between their first week (smallest ones) and 3rd week (top right), but sometimes you just do what ya gotta do.

As I've said, I converted the Ebb & Flow (aka: flood/drain) system to a drip system. You can see here that I've put 4" rockwool cubes in and set up the drip system. The green in the main 3x3 tray is algae. This is only 4 days after cleaning the entire system with a bleach water solution (hydroponics can be just about sterile when done right). Wherever there's light and water, there will be algae! Note the small fan. This is to keep a good air exchange going even when the tent is closed (vents in bottom to let air in). More importantly, it causes the plants to grown nice, strong, thick stalks. Needed to support the massive growth they see in a hydroponics system. The small flourescent light in the lower left provides the low level lighting needed by the seedlings. When started I slide the garden flat with humidity dome underneath it.

This next picture is the "control board" I built. It consists of an indoor/outdoor thermometer/barometer. You can see the outdoor sensor wire hanging at canopy height (top of the plants) so I not only know the condition of the room, but know what the plants are feeling. The lower box (blue) is a Hanna grow check monitor. It monitors pH and EC (Electrical Conductivity - much more accurate than PPM/TDS). It also monitors the nutrient temperature in the reservoir. I tried saving $50 buying this instead of the more expensive one. Don't do it. This thing is a piece of crap. It doesn't even function properly when the light is on. Now I have to spend $300 for the good one and have a $250 brick. The board itself is a cutting board that I drilled holes in. I used 1/4-20 hardware to attach it all to the board. Everything is held up with jack chains and s-hooks making it infinitely adjustable.

This is a 400 watt Metal Halide light in a hood with with 6" vents and a glass cover making it airtight. 6" vent tubing pulls cool air from outside the tent on the left via the 6" Sunleaves fan on the right. This cools the light bulb so as not to heat up the plants. Hot air exits through the portal on the right. Notice the portal at the top right in the ceiling, and also the cross-bars in the roof. I'll be talking more about them later. The Sunleaves fan is *really* quiet.

The tent itself is made by Secret Jardin. It is a model DR120 and is 4'x4'x7'(not sure about the height). It's the best on the market. Lightproof, portals, vents, and access doors everywhere. The entire interior is reflective allowing me to use a 400watt light instead of a 600watt - It paid for itself in a year with the electricity I saved. It also has a removable liner in the bottom to catch water and make clean-up easy between harvests. The entire tent folds up into a bag about 6" in diameter and 3' long.

Another shot of the florescent shop light (with grow specific tubes). If you look really close below the light, you can see another small portal where the electric cord exits. More on this later. You can also see one of the side access doors - these make it really easy to reach the plants in the back of the tray.

Here is a picture of the other side. Another portal in the bottom, the other side access door, and a roll-up velcro'd vent door. It has a fine mesh screen built-in to keep nasty critters out. You can also see most of the electrical connections. Coming out the portal are the air pump, low volume water pump (for drip system), and fan cord. There's yet another lower portal in back. Cables coming out of that include the high volume water pump (for ebb & flow - I use it for draining the reservoir quickly), HID (MH) light to the ballast, and the PH/EC monitor.

The ballast for the HID/MH light:

It runs 18 hours a day. It's plugged into a simple (but heavy duty) timer:

This is the small pump I use for the drip system. It's about $13 and uses something like 12 watts. The big one for the ebb & flow system (now used for draining the reservoir) was about $100 and uses about 100 watts. Again, big savings going to the drip system.

It's *extremely* important to keep the nutrient mix well oxygenated. Because of this, I use two 18" airstones on a dual diaphragm pump. I have had several aquariums in my life, tested many pumps, even a small industrial "quiet" greenhouse pump, and this beats them all. This entire set-up is directly above my bed. With this pump and the Sunleaves fan, the only thing I hear at night is the water bubbling.(!)

I have tried several brands of rockwool over the years, and Grodan is simply the best. Doesn't compact, doesn't crumble, and there aren't loose pieces clogging up the water pump, drippers, or drain-back tubes. I prefer the 4" over the 6" cube. They are about 1/3 the price - downright cheap if you buy them by the case. 6" cubes have the same problems of the roots growing out the bottom anyway. Note that rockwool has a fairly high ph level. Hydroponic/Aeroponic systems need a ph between 5.3 and 6.2 depending on the system, nutrients, and what you are growing. In order to get the ph down to a reasonable level, soak the rockwool cubes in ph 5.0-5.5 water for 24 hours (add "ph down" to the water to get it to this level). With starter cubes, you can put them in a salad spinner to remove the excess water. With the big cubes/blocks, about all you can do is put the plants in them and not water them for a day or two.


As I was saying. 6" cubes have the same problem as 4" cubes... the roots grow out the bottom and lay on the tray, exposed to light. This is Very Bad! Roots must be kept in darkness. Exposure to light turns them green - they start acting like the plant (above ground) instead of roots. Additionally, laying in a pool of water in the drainback channels in the tray can cause root rot. Root rot is bad. Umm-kay?
So, how do we avoid this? How about a semi-porous media in the bottom of the tray? Yeah, that would do it. It just so happens that they make a mat out of coir (treated coconut husks). They also make cubes (similar to the rockwool cubes I'm using). Something I want to experiment with in the future as it's 100% organic and biodegradable. Rockwool is not. Coir requires a different chemistry than rockwool due to it's water and air retention properties, but that's another post. Here's the coir package:

Here's the tray with the mat in it after I cut it to size and trimmed holes for the drainage and flood pipes. It doesn't need to be cut neatly. It just needs to fit in the tray and be under the rockwool cubes. Normally this would be put in before the cubes and drip stakes were in place. I only did it this way (having to remove everything and put it back) to make all the pieces of this project easier to understand. The coco/coir mat will give the roots something to grow into and protect them (mostly) from the light. Just remember not to lift the cubes after about the 2nd week or you'll rip the roots from the plant! It will be interesting to see if the coco coir ends up covered in algae since it will be damp and exposed to light.

This picture shows the tee fitting for the drip system. The small pump goes into a 1/2" hose which comes out the lid of the reservoir. It goes to this tee, which has 1/2" hoses coming out each side. 90 degree elbows, then 1/2" hose to the back. The spaghetti tubes that feed the drip stakes are 1/8" and plug directly into the 1/2" hose with hard plastic fittings. These are all common parts available at any indoor gardening center for a few dollars. Below the tee is one of two drain pipes that go back into the reservoir. You can control the water level in the tray (for ebb & flow) by putting extensions between the tray and the drain cap.

As I was saying above. I use the big ebb and flow pump to drain the reservoir (usually filled to 20 gallons, though it will hold 30) for the weekly (or therabouts) nutrient changes. I do this via an adapter and about 50 feet of 1/2" tubing. This is why you see the 1/2" hose plugged into the center of the table in a few of these pictures - I was in the middle of changing nutrients.
The big pump gets rid of about the first 17 gallons. It sets too high in the water to get the rest. So I then unplug the drip pump from the tee, plug it into the 50' hose, and that gets rid of all but about the last quart. Effective and relatively fast.
I'm just using the rockwool cube to hold the hose down so it doesn't go flying out of the tray and make a mess of things.. spraying nutrient solution on the carpet at a rate of about 1 GPM is bad.

Here's a picture of the rubbermaid reservoir with the holes I cut in it for various stuff. On the left is the power to both the drip pump and big ebb & flow pump, as well as the 1/2" tube from the drip pump to the tee fitting in the tray. On the right are the cables for the ph and TDS sensors, as well as both hoses from the air pump going to the 18" airstones.
Note two things here. First is the green things in the airlines. These prevent water from draining back to the air pump in case of power or pump failure. This *can* siphon the entire reservoir dry onto your pretty floors. These are available at any pet/aquarium shop for about $1 each. Second. Notice all the white stuff on the one airhose (the other one was replaced with a new piece). Those are the nutrient salts that I spoke about that can build-up on the root system and even cause nutrient lock-out. A drip system will prevent most build-up on the roots. Nutrient lockout - that's a whole 'nother blog posting as well.

The other end of the 50' hose, draining into the bathtub. Bleach bottle is there to keep the hose from flopping out. Note to self - next time I take a picture of my bathtub, clean it first!

These are the three parts of the nutrient mix. They can't ship them all together in one bottle or they interact and will cause nutrient lock-out; preventing the plants from absorbing the nutrients. These bottles are really expensive, but a little goes a long ways... a few tablespoons of each for a 20 gallon solution.

So, how do you know how to mix all this stuff together? Good question! The nutrient companies provide feed charts. I have a spreadsheet for these. I simply plug in my base water PPM, gallons of water, and it spits out the answers. (again, PPM is messy as different companies use different formulas and EC is the true measure.. so I use the formula that puts me in the middle).

To this, I add a little Royal Gold (Fulvic Acid) and Super B+ (B vitamins). These help immensely with fast growth and are worth the extra money. These two are the white bottles in the background of the above pictures.
While we are on the subject of nutrient solutions, a few quick notes. All nutrient solution feed charts are based on the assumption that your water is 0 ppm. The only water that is 0 ppm (or close) is distilled and reverse osmosis water. I looked into a portable reverse osmosis system (along with a reservoir and float valve so it wouldn't take a whole day to change the nutrients). In addition to being pretty expensive ($500-$600), it introduces a whole 'nother problem - Nutrient solutions don't typically have calcium or magnesium in them as they expect your water to have it. Distilled and RO water do not. Which means you have to buy an additive such as Cal-Mag and figure out how much you need.. more hassle, more expense. No thank you!
Hydroponics will work well as long as your water is initially below 200ppm. Ideally below 150ppm. I know my water hovers right around 300ppm, so I simply add a few gallons of distilled water to it to get it down to between 150 and 200ppm. It's not a linear thing and doesn't take as much as you might think. Usually 2-3 gallons in a 20 gallon mix is enough.
One more word on water: If your water is chlorinated (thankfully mine is not!), you need to let it set, ideally for about a day, before you add it to the system. Chlorine is cyanide to plants and any beneficial microbes living in your system (this goes for soil as well).
As you already know from our earlier discussion, you need to get your ph to between 5.5 and 6 (I try to get it right at 5.5 when I do the nutrient change as pH tends to rise as water evaporates and the nutrients become more concentrated. You'll also want to know what your PPM/TDS is once all the nutrients are added. Most nutrient companies give you measurements, but these only get you close. You'll final measurement is PPM/EC. THAT tells you how much nutrient(s) you have in the water.
Before you can do that, you'll need to calibrate your ph and TDS/combo meter. This should be done weekly. To do it, you'll need reference solutions and the manual for your meter/monitor. They look like this:

Note that you should always keep your ph meter wet. Most probes come with a cap and storage solution. New probes are expensive. Treat them nicely.
Ok, enough about the system already. On to the 'maters!
These Gold Medal tomatoes, being an indeterminate type (mainly meaning vine-type as opposed to bushy or small tree), has presented a few challenges. Namely, what to do with all those vines in such a small space. I could use a rope trellis, which would limit access. A hard (wood/plastic) trellis, but that would make access impossible. I even bought a book on growing tomatoes indoors, and they politely side-stepped this whole discussion. Finally I had an idea: I will use twine. Lay one end of it in the rockwool cube hole so that once the starter cubes are in and roots grow through to the cube, it's held solid.
I'll then take the other end and tie it to the poles/beams in the ceiling of the tent. So I measured out a piece as far as it might possibly need to go (across the tent) plus room to tie a knot, and made 19 more just like it. I then laid one end in the hole, and the rest over the side of the tray taking care not to lay them in the tray. Don't want them to get all wet and funky and possibly give a plant the cooties later on.
I won't tie up the other end to the ceiling until I need to. No sense in making things any more awkard to work on until needed. Here's a picture of the complete system with the strings in place (still draining nutrients, hence the hoses):

(again) The tomatoes were started in rapid rooters. They are ready to transplant into the rockwool cubes when roots start to show through:

Transplanting is as simple as (gently, so as not to damage the roots) placing them in the holes in the rockwool cubes. Note that I have put the smallest plants the farthest away from the light as they need the least, while the bigger plants will love it. The exception being the two plants in the lower right corner (front right of the tray). These were the seperate strain given to me by the stable owners. They will still be fine here. The reflective surface of the tent and the 400 HID light in this small space give them plenty of light.
At this point, everything is ready to go. I've added 20 gallons of tap water and 2 gallons of distilled water. I've added all the nutrients for a 20 gallon batch (this allows for 2 gallons of evaporation during the week) by pouring them right down this hole after removing the drain cap:

I've made a dipstick to keep an eye on water levels during the week. Here you can see it showing 22 gallons.

I plug the drip pump directly into the outlet for a minute to make sure water is going everywhere it should and no place it shouldn't. All looks well:

So I set the second timer to water twice a day for 15 minutes and plug the drip pump into it (not shown):

Chances are this will be too much to begin with and the plants will start to wilt. If they do, I'll back it off to once a day. Hard to believe that in a few weeks they will need watering 10-16 times a day!
Normally I would check pH and EC immediately after a nutrient change. At the beginning of a grow, since the rockwool (even well soaked in ph 5-5.5 water) will impact the readings, I'll wait until tomorrow to take those measurements. From that point on, I'll be checking water level, temp, ph, TDS, as well as air temp, canopy temp and humidity every day. I'll be keeping a spreadsheet/log of these readings so that if something starts to go wrong, it will be easy to isolate what's happening.
BTW. If you are really interested in this subject, I have come across three outstanding books:

The first (on left) is a great introductory book that won't scare off anybody. It even has plans for several different systems (very easy to build) in the back of the book. It's worth it's price for the plans alone as commercially built systems are ridiculously expensive.
The book in the middle... it's the bible. It covers every aspect of gardening, both hydroponic and soil. Systems, nutrients, lighting, pest control, nutrient deficiency analysis, the list goes on. If you only buy one book, make it this one.
The last one (on right) is a college level textbook. It has everything and then some. From plant microbiology to commercial greenhouse operations to making your own nutrient formulations from elemental salts. This book has it all. It is NOT however, light reading. It's my bedside book. A page or two a day is all you need. ;-)
In the upcoming months, I'll be playing with a Deep Water Culture (DWC) system as well as a DIY fogger system. I'll also be doing a comparative grow with and without CO2 to determine if it's really worth the time and money. Stay tuned!
If you have any questions, suggestions, etc. Please drop me a line. I'm always interested in tinkering with new systems and ideas (more than growing the food, really).
Subscribe to:
Posts (Atom)